Use Automator to compress a WordPress plugin excluding hidden Mac files and folders

If you are a WordPress plugin developer like me, you know the value of saving time and being efficient. Automating routine processes like creating a WordPress plugin archive that does not hold any unnecessary files can save a lot of time.
The issue
If you have ever used default Mac compression feature from the context menu, the compressed archive that will be created will include additional Mac system files and folders like .DS_Store and __MACOSX. These are completely useless to WordPress end-users and serve only to create clutter in your beautifully structured plugin as well as take additional space.

In addition, you may also have hidden files like .git or .svn inside your plugin folder which you would like to leave out of the resulting .zip file since previous versions and commits should remain in your preferred version control systems. Including these hidden folders can make your plugin ten times heavier.
Compress excluding hidden files
Digging through the internet I came across a script that can be run inside Terminal to compress a folder with its contents and at the same time exclude unnecessary files or folders.
Let’s assume that we have a folder on our computer called container_folder where our plugin folder called cartbounty-pro resides.
1. Open Terminal and enter the following line to navigate to the place where you have the folder that must be compressed.
cd /location_to/container_folder2. Compress the plugin folder (in my example name of the folder is cartbounty-pro) and exclude unnecessary files by running this script.
zip -r cartbounty-pro.zip cartbounty-pro -x "*.git*" -x "*.svn*" -x "*/.DS_Store" -x "*/__MACOSX"3. Now your compressed file should be ready. To see and validate the contents of your archive you can use the following script.
zipinfo cartbounty-pro.zipI have showed one way to compress a folder that later can be used as a plugin inside WordPress and your user’s will not be asking various questions about why is the plugin so heavy or what does the __MACOSX folder do inside the plugin.
Now let’s look at how we can automate this process, increase efficiency, and avoid remembering each Terminal script every time we need to release a new plugin version.
Putting everything together inside Automator
To automate compression process and avoid Terminal scripts we can use Automator which is a built-in Mac application. We can use Automator not just to create various new applications, but also to add new context menu options (options that you see when right clicking on the folder or screen). It will offer us a convenient and quick way of compressing our folder right from the context menu.
After searching far and wide, I was able to find and put together a working solution that helps to automate .zip archive creation process excluding the .DS_Store, __MACOSX, .git and .svn data which is also easily accessible from the context menu when right clicking on the folder that must be compressed.
Create new compression Application
1. Go to your apps and open Automator.
2. Select Application.

3. Search for “get selected finder items” and double click on it to add it to the workflow.
4. Next search for “run shell script” and double click on it to add it to the workflow.
5. Make sure that Shell is set to “bin/sh” and input is set to “as arguments”.
6. Now it is time to add the script.
name=("$@")
cd "$name"
cd ..
zipFileName=`basename "$name"`
zip "${zipFileName}.zip" -r "$zipFileName" -x "*.git*" -x "*.svn*" -x "*/.DS_Store" -x "*/__MACOSX"
7. Save Application inside your Apps. I called it “Plugin zipper”.
Adding Application to Quick Actions
Now that we have our Application setup, let’s add it to the context menu so that we can right click on the plugin folder and quickly compress it properly.
1. Go to your apps and open Automator.
2. Select Quick Action.

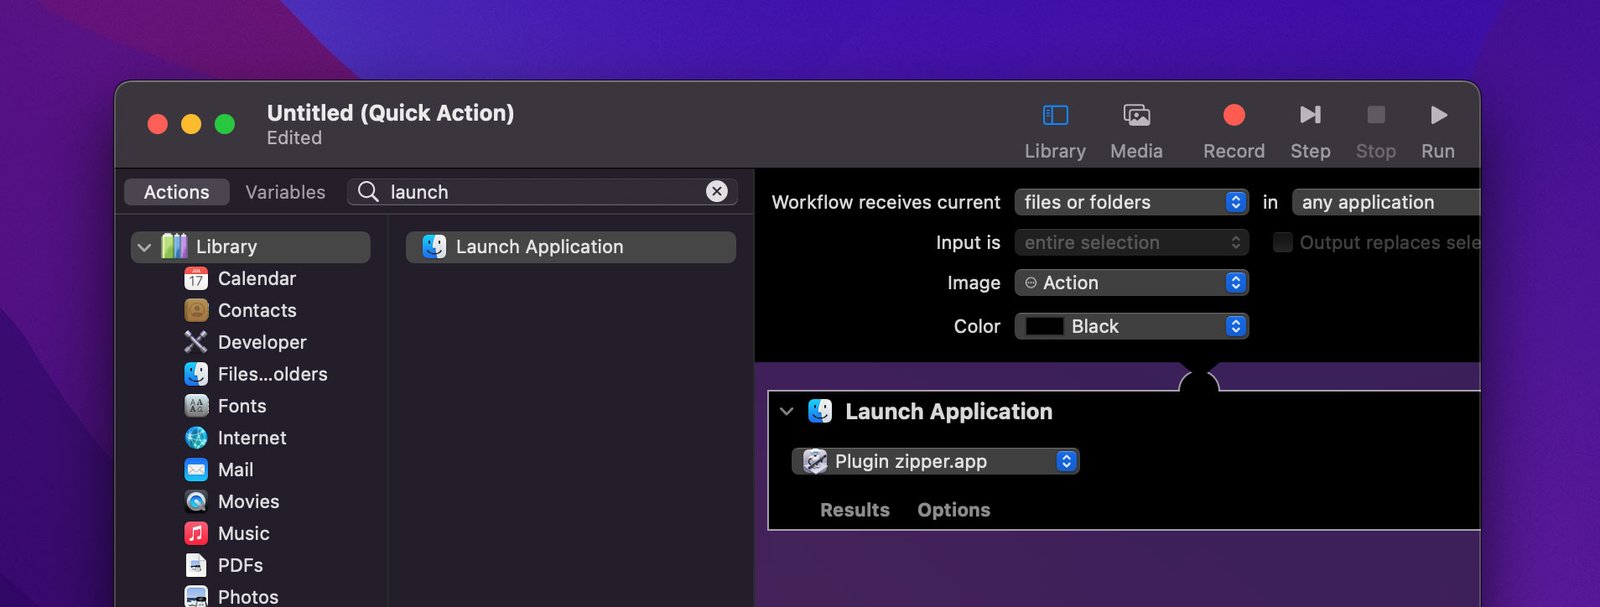
3. Set Workflow receives current “files or folders”
4. Search for “launch application” and double click on it to add it to the workflow.
5. Now choose the application we created before (in my case it was Plugin zipper.app)

6. Save your quick action. I named it “Compress plugin”.
Final result
Now go to your plugin folder and test out the new Quick Action by right clicking on the folder and selecting your newly created Compress plugin action. You should see that next to your folder appears a new archive which includes your plugin files.

And that’s about it. Now you should be able to save your time, be more time efficient and have a Compress plugin option under Quick options without the requirement to use Terminal every time you want to release a new version. This helped me to learn some new tricks working with Automator and I hope that my experience will help you. Sharing is caring :)


Your thoughts